Showing posts with label Home Decor. Show all posts

Thursday, September 05, 2013

Guest Post - www.ShopAtHome.com

Fall in Love With These Thrifty Seasonal Decorating Ideas

By Jennifer Osieczanek, ShopAtHome.com


We've flipped the calendar to September, and while the heat isn't subsiding, pumpkin spice lattes are back, so let’s just pretend it’s fall, OK?


When the seasons shift outside, I like to bring a little of that magic inside. Here are a few tips to incorporate the essence of fall into your home without breaking the bank.


DIY decor. A simple project to bring fall into your home – quite literally -- is to frame four patterned sheets of paper with the letters FALL printed on them.


If you’re like me, you've somehow amassed a collection of picture frames not being used or are ready to part ways with a few of the pics you have on display around the house. Simply gather up four frames -- they don’t have to be the exact same size or style -- but make sure they are all one color. Black would be best and spray paint is your friend.
At a craft store, pick out four sheets of patterned paper in fall prints. Think oranges, deep reds and yellows or browns. Keep the patterns simple and delicate for a polished feel.
Cut the sheets of paper down to fit your frames.


The next step depends on whether you love your handwriting or have access to other crafting tools. I've got a Cricut, so I’d use that (find it at craft stores or Walmart) to cut the letters to spell “FALL” out of black construction paper. 


Cricut.com

I’d also vary the fonts for a fun look. If you don’t have a tool to cut out letters, you could simply draw your letters by hand with a black marker. Then you just glue them to the printed paper.


The final step is to frame your letters and display. This would be perfect for a mantel or entry table.


The great pumpkin. Another way to make your home festive for fall is with pumpkins. Instead of buying actual pumpkins, which can get quite pricey, pick up a couple fake ones at a craft store or online (ShopAtHome.com has lots of coupons for Hobby Lobby). By purchasing foam pumpkins, you’ll save in the long run because you can use them year after year. Create a centerpiece with small to medium pumpkins and add some candles. Simple, easy and classic.


If pumpkin orange doesn't fit with your current decor, you can find white and black options, too. Or, get really creative and paint them to up the style-factor. Think white with black polka dots or a black-and-white checkerboard pattern. Your imagination -- and steady painting hand -- are the only limits.


Not the crafty type? No worries. I found this super-cute owl online at Target.com.

Target.com

Yes, he’s more than $46, but by using coupons via ShopAtHome.com, you get free shipping and an extra 2 percent Cash Back (in addition to the 5 percent you already get with a RED card).


I’d mull painting him bronze to make him a little more fall-like, but he’s also good-to-go as-is, depending on your personal style.


Now, if only it would feel like fall outside.


Jennifer Osieczanek writes for ShopAtHome.com

Saturday, August 17, 2013

Master Bedroom & Bathroom

When we bought our house, we had our choices down to two great houses.  One of the things that really sold us on the one we chose was the master bedroom and closet.  It was a huge room that had great closet space and ended up being a great room with a little work...


You can't really tell from this photo how large the room is - its dimensions are 16 x 13 so we had plenty of space for furniture without it feeling at all cramped.  They had two sets of blinds on the window because it was really wide - it made the window look like a mess.  They also had their TV in the corner by the closet so there were wires running over the closet door - I hate when you can see wires.

Since the master is upstairs, it got new carpet like all the other rooms.  It also got new paint... I loved the paint color in our room - it was relaxing and really pulled everything in the room together.  


Excuse the mess - we were on our way out of town, but wanted
to show J's family pictures of the new house  :)

One thing I didn't love about our house was the master bathroom.  It was nice to have the en suite, but it was a really small bathroom with only one sink.  It was adequate, though, and we never really had problems begin in each others way.  


  • This room also got painted - the same color as the twin room.  
  • Jason replaced the light fixture and framed the mirror - we actually tried to replace the mirror, but it was huge and couldn't find anything we liked that would fill the space properly.  
  • It grossed me out to have a towel bar over the toilet (wet towel + toilet = GERMS) so we took that down and got over the door hooks instead.
  • Right before we put the house on the market, we put the same vinyl tile in here that we put in the guest bath and it made a HUGE difference!  


This is actually a really good place to see what we did to the door knobs in the house, too - Jason spray painted all of them with oil rubbed bronze spray paint.  I just LOVE how it turned out and it held up really well - I found the idea on Pinterest  :)

Had we stayed longer, I probably would have made some additional changes to the bathroom, but overall, it was a great little space and it was a great "first master" for us!

Thursday, August 15, 2013

Guest Rooms

We had a 4 bedroom house - not because we needed the space, but because we originally we thought it would be a great chance to grow in to the house.  One of the rooms was over the garage, and ultimately it was a bonus room - which ultimately left us with two guest rooms.

This is what those rooms looked like when we moved in... again - sorry for the poor quality.


The first two things we did when we got into the house is replace all the carpet upstairs and paint just about every wall in the house.  I use the term "we" loosely because it was really Jason who did 98% of the work.  We also painted all the trim in the house white to really make the colors pop.

In the room that was the office, we created what we thought would eventually be a nursery, so although it was slightly larger than the other guest room, we put a twin bed in there.  


We purchased blinds for all the windows and put up some white heat reducing curtains, because the window faced south and got afternoon sun.  There were some other things that I wanted to do with this room, but never got around to it.  

One of those things would have been to make a really awesome, long shelf like this one:
EASY DIY Entryway Shelf with Hooks from Shanty-2-Chic.com
via

The shelf would have gone on the long wall that's to the left of the dresser.  Overall, the room was cute and comfortable and it had a handful of visitors who stayed there!

Our other guest room ended up being much more finished - it was also the room that most of our guests stayed in.  For only being there for 2 years, I'd say we had a good number of guests come visit - mostly family, but we hosted some great holidays at this house!


The wall on the left in this picture is the same color as the twin room.  I wanted an accent wall in this room and I was not disappointed by how it turned out.  I loved the colors of this room and it felt warm and comfortable.  One thing you cannot see in this photo is the great armoire that we got from my aunt.  It is a beautiful dark wood piece that is about 4' tall and was originally a TV cabinet.  It was a great place to store all the bed linens!

I love creating spaces the guests walk in to and feel at home - I can't wait to have a place for visitors again!

Monday, August 12, 2013

Dining Room

We are only a few days away from officially closing on our house - it's been kind of a long road, but overall I'd say we have been pretty lucky with the quick process that we've been through.  Before I officially say goodbye to the house, I want to share some of the improvements/changes we made to the house during the two years that we owned it... starting with the dining room:

I'd say my decorating style lends to clean lines and timeless furniture and fixtures, but things that also make a space feel like home.  For some reason, I am not a fan of yellow - I don't mind gold accents, but it's always been my preference to avoid yellow as a main color in my apartments/houses.  This is what our dining room looked like originally (this is with the previous owners' furniture and sorry for the poor pictures... I didn't anticipate needing better ones):


The dining room was one of the first rooms completed - some minor updates made a huge difference:
  • Remove the border and new paint (a light green with grey undertones)
  • Remove the curtains and get 3" faux wood blinds
  • Change the fixture - purchased from Lowe's

Issue: there was a large passthrough between the livingroom and the dining room, but the wind was not centered on that passthrough - this creates problems for me, who likes symetry, and makes the chandelier and the table look weird. 

Solution: NONE - gotta live with it  :)

My aunt gave us the dining room table and the hutch that you can barely see on the left side of the photo.  The chairs are from Steinmart and I am pretty sure we got them for around $60 a piece, which is way less than I found dining chairs for anywhere else!  The chairs are similar to this (with dark legs)...


Dining Chair Oak Legs by GJC Furniture Newstead Stoke on Trent. Dark Brown Faux leather covers. Stylish & modern would suit any dining room with great design and quality feel.
via

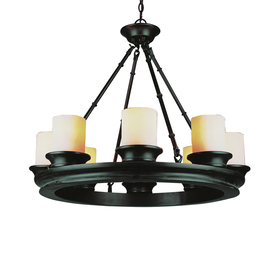
I love the light fixture and I considered taking it with us when we left, but it was not expensive enough for the worry of taking it down and having to put something else up.  Here's a better shot of the chandelier.


Bel Air Lighting 8-Light Modern Meets Traditional Oil-Rubbed Bronze Chandelier
via

The changes to this room were minor, but it felt like it made a large impact and we hosted Thanksgiving, 2 Easters and a bunch of other random get togethers that this room created a great setting for - fun, family and great conversations!!

Monday, May 13, 2013

Look what I came home to!!

I was out of town for the first couple of days that J's mom was in town and when I talked to him on Thursday night, he told me they had a surprise for me that I'd get when I got home!  I had no idea what it could be, and I was so excited to walk into the kitchen and see this...


They got it at a cute little antique store in town, and it fits perfectly in this space - I was having the worst time deciding what to put there!!!  It's such a cute addition to our newly redone kitchen (posts coming soon) and although I really hate to take away the place settings that look so cute there, it's a great new place for J and I to spend some quality time together!

Saturday, March 30, 2013

Easter Decor

I left my Valentine's Day decorations up until last weekend, when I decided that I really needed to move on to something Easter/Spring (even though it was snowing last weekend - not very spring-like).  My parents are here for Easter, and we are having a friend come join us, so I thought I'd get a little festive...

Couldn't pass these cuties up - the only kind of bird I like


I also did a very quick update of the hydrangea wreath I made last year.  I took out some of the flowers that the birds had flapped to pieces (I get chills thinking about how those birds could have flown in our house) and put in some new flowers... GOOD AS NEW!!!


Hopefully as Monday brings April, it also brings spring - I'm ready for it!!!


Monday, March 25, 2013

DIY Bathroom Improvement

It was a BIG weekend for us!!!  We did a lot of running around on Saturday - getting some stuff ready for Easter next week, and then on Sunday, we finally tackled one of our home improvement projects... the guest bathroom floor.

This is the before picture of the guest bathroom...

Before we moved in

Hard to see, I know... it's a small bathroom so it's not easy to take pictures of it.  It was a basic, builder grade bathroom with those ugly vanity light bulbs and a terrible wood medicine cabinet.  WELL, here are some things that we've done to the bathroom since we moved in:
- New light
- New mirror
- Paint
- New Hardware
- New Floor

AND, here are pictures of the finished product:


After Phase 1 - before the floor

New light (Lowe's) and mirror (Home Goods)


Above the toilet (from Home Goods)

New Hardware

NEW FLOOR!!!

And it's complete!!!
Overall, I'd say we were pretty productive this week - it took about 3.5 hours, start to finish, including removing the toilet, cleaning the floor, cutting the tiles and everything!!  We used a peel and stick vinyl tile from Lowes:

Style Selections 18-in x 18-in Sable Stone Finish Vinyl Tile
Style Selections - Sable Stone (we used 12 x 12)
I'd definitely recommend the product, especially for a small bathroom where you won't get direct sun (we have vinyl tiles in our kitchen that are pulling up because they had direct sun on them for a long time).  The feel of them is great, they won't discolor like linoleum (ours was yellowing) and I think we spent about $40 on the whole room!!!  What a great weekend!!!

What do you think???

Wednesday, January 30, 2013

Valentine's Day Decor

I don't usually get into Valentine's Day, but for some reason this year, my house felt so empty once I took the Christmas decorations down.  AND someone gave me a hard time last year for having a "Christmas wreath" up in February - since when is an evergreen wreath with pines cones a "Christmas" wreath - it's a winter wreath!!!  But anyway, I got a small amount of inspiration this year and came up with some fun stuff...

Simple (a.k.a. cheap) centerpiece


Hobby Lobby purchase - I love that store!
JoAnn Fabrics purchase - another fav store

AND, for the DIY in my Valentine's decor... I wanted to make a wreath, but my door is a deep red so the pink/red/purple I was seeing everywhere was just not speaking to me.  But, I was inspired by a wreath that I found on Take Heart and had to make it.  It was so easy and I just love how it looks!!  

I was going to give my own directions, but her's are fantastic, so if you'd like to make your own, check her out!


Close up of the cute paper flowers!!
Do you decorate for Valentine's Day????

Tuesday, January 29, 2013

DIY Ottoman

My mom came down a couple weekends ago to help me get my house decorated.  Yes, we've lived here for a year and a half, and it's not like I didn't have anything on the walls, but there were a lot of rooms that were just incomplete.  I couldn't get myself motivated to get off the couch this morning and take pictures of our house (plus, not everything is done yet) so instead,I decided to share one of the other projects that my mom and i worked on... some ottomans for my craft room.

So this room is a work in progress.  It's the bonus room over our garage, so it's a big room.  We've got my craft table in one corner, a desk in another.  We also have a couch and a bunch of book shelves and a TV so it's a great multi-purpose room!

I've seen a bunch of DIY ottomans made out of IKEA side tables on Pinterest so I decided I'd give it a shot.  In case you want to try it, you can follow along.

What i used:
2 IKEA Lack side tables
2" foam squares (trimmed to be the same size at the table tops)
2 yards white muslin (54" wide)
2 yards home decor fabric (54" wide)
heavy duty staple gun with 1/4" staples
scissors

Make sure your fabrics have been ironed and cut them in half ( 1 yard x 54")

Put one square of muslin down on the floor and set the foam in the center of the fabric.

Set the table (top down without legs) on the foam.

Cut squares out of the corner of the fabric so eliminate bulk

Fold the muslin up and attach to table with staples - start with the middle of the fabric and then left and right.  Do this all the way around the bottom of the table until it looks like this:

You'll be able to see the foam and the table on the corner
edges, but this is ok!!
Use your scissors and poke holes in the muslin where the holes for the legs are located.

Next, lay out your home decor fabric (face down) and lay the table on to (face down).  If your fabric has a pattern, be sure you're centering the pattern as well as putting it on straight.

Fold the fabric up to ensure you have enough to staple (approximately 2 inches) and if you have more than that, you can trim it so it's easier to work with.

Fold up your first edge and attach with 5 staples across.  Do the same thin on the opposite side of the table.

On one of the edges that have not yet been attached, start by folding and attaching the corners so that they look like this:


My first instinct was to fold and wrap the rest of the fabric like a gift, which would have made it look like this:


Instead of using the more triangle like folds/angles, I used my fingers to slide the flaps folds wider and it squared the fabric off a little more.  Then I stapled in the middle first, and then along the rest of the fabric. 

Kind of hard to see, but the fold in the fabric is
very close to the corner edge of the table
Then i poked the hole again where the legs would go, and I reinforced the fabric between the hole and the edge of the table with an extra staple... it helps to hold the fabric in place while you're tightening the legs.


Be careful when putting the legs back on - you may have to hold the fabric down as the top of the legs get close to the bottom of the table, and you probably won't be able to tighten the legs all the way.

Here is the finished product:


I probably could have shortened the legs on the  tables just a little bit, but overall I think they look great and they are so comfortable!!  So, what do you think???

Coming soon - Valentine's decorations  : )

Friday, October 12, 2012

Searching for Energy

I don't know where this week has gone, but I've been EXHAUSTED and wishing that I'd just have some energy appear... it hasn't.

We had a great weekend LAST weekend, full of wedding fun, and now we are about to start ANOTHER full weekend of stuff.  I know what you're all thinking... what kind of person complains about the week flying by and the weekend being here?  Believe me... that's not what I'm saying... I just look ahead and see no "free" weekends in my future and all of a sudden, I'm exhausted.

This weekend, J is going to work on our deck, which badly needs a make over, and I'm going with a friend and my cousin to the happiest place on earth... no, not Disney World...

(cue the sounds of angels singing)

Yep, we are packing up and heading for Ohio for a day of shopping!!!!  This means that tonight, I will be cleaning up the room where all of this furniture will end up... the room over the garage.

I'm committing my Sunday to building whatever I buy (putting furniture together is one of my most favorite things in the world to do) and getting the room in order so that it goes from wedding/junk room to family/sewing room and office.  Before and after pictures coming soon.

Wish us luck on our excursion... I'm hoping to be back on track next week  :)

Friday, September 14, 2012

This Weekend

I have to stay in town this weekend because I'm on call at work... I am planning on using this time at home to get some crafting done!  I have big plans for a DIY Birthday present for a very special 1 year old whose Birthday I'll be attending in a couple of weeks... more on this coming after the Birthday party.

I'm also working on some fall decorating ideas.  I know I want to make a wreath and I want a new centerpiece for our dining room table.  Here's what we had last year...

My Thanksgiving centerpiece

I'm thinking something more like this... maybe with a burlap table runner, and maybe some stuff around it...

via
As far as the wreath goes, I'm thinking that I like one of these options...

fall wreath - LOVE!!!
via
Burlap Front Closeup Edit
via
I also want to do something on our steps/porch, but I haven't quite gotten there yet  :)

Hope everyone has a great weekend and Chicago recaps are coming next week, for sure!!

Thursday, May 24, 2012

Filling the Bathroom Shelves

In my Weekend Recap on Monday, I mentioned the fact that we have these shelves in our half bathroom that are in DESPERATE need of some "stuff" on them...


You may also remember the antique mirror that I painted and serves as the "theme" setter in the bathroom... 


Ultimately, I'm calling the theme of the bathroom "old".  I want stuff that looks old... which doesn't necessary mean it's antique because it doesn't have to BE old as much as it has to LOOK old, and when I've Googled "vintage" for decorations, it doesn't seem to be old enough.

So, as I've been Googling stuff tonight, here are some ideas I've come up with...

Globe, Clock, Key, Jacks, Tricycle, Bottles
I'll probably go ahead and throw in a candle here or there, just to soften things up, but overall I think I now have my inspiration!!!  Now I just have to find stuff...

Any other ideas for me??  I'm still taking suggestions and once I get the house decorated, I can start showing you what we've done so far... hopefully that will create a little extra motivation to voice your opinion  :)