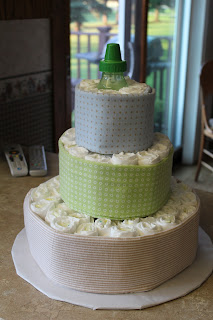
Well, while we were on vacation, J's cousin had a baby and we made her a diaper cake, too. This time, I made sure I took pictures so I could share the instructions.
Here's what you'll need:
80 (ish) Size 1 Diapers - I used 84 in my first and 80 in my second
Rubber Bands - variety of sizes (I got mine at Target)
Straight Pins - around 20??
Cardboard Cake Round (I used 14") or other base (you could use a cake plate, too)
Dowel Rod -OR- 2 Bottles -OR- a Bottle and a container of Baby Powder -OR- a bottle of champagne
Packing Tape
4 receiving blankets, 2 of the 4 matching if possible
Ribbon, 1-4 coordinating colors
Other little stuff from the registry that you can decorate with
________________________________________________
Start with a diaper... I used Pamper's Swaddlers... I'm calling this "face up"
Flip the diaper over to "face down" and roll the bottom layer toward the bottom of the diaper.
You'll only be able to roll it to the bottom of the leg hole and then you'll have to flip it over again to be "face up".
When it's face up, you'll have to fold the bottom of the diaper up to the roll and then roll it the rest of the way. It's kind of hard to see in this picture, but if you're doing it, it will make sense... you can't get a tight roll without doing this.
Once your diaper is rolled, put a rubber band around it to hold it together. Repeat this until you have all diapers rolled up.
To put the cake together, you'll start with your base. For this one, J just cut a circle from a cardboard box and we covered it with freezer paper.
Then you'll want to attach your "structure" to your base with some packing tape. This is what you're going to put your diapers around... I used a dowel rod for the first one (which is probably why it was easier to get more diapers around it) and if you think your friends/family would appreciate it, this is also where you could put a bottle of champagne for the parents to celebrate with :)
Start by putting a ring of diapers around the base to start the bottom layer.
Do the same to make the second layer and the top layer.
This is where you kind of have to feel your way through the process. In my first one, I did some algebra and came up with an actual number of diapers that should have bee in each layer. WELL, that was a good starting point, but I ended up making adjustments, so just know you'll have to be flexible.
On this one, I grouped the diapers into groups of 4, kind of in the shape of a diamond, and then filled in to make it sort of look like a circle. Ultimately, the receiving blanket is going to really make the circle.
Once you have your layer made, you'll wrap two receiving blankets around and pin them.
CAUTION: do not pin into the diapers... diapers should not have holes in them.
If you have two matching blankets, put them both on the bottom. I folded the visible edges over to make them look finished.
Put your second layer of diapers on, wrap them with a receiving blanket and pin them.
Same thing with the top layer...
Here's what it looks like when you are done putting the layers together. With this one, we obviously left the bottle sticking out of the top... we thought it was cute. If you're using a dowel, you would want to cut it so it is just below the top of the top layer.
The only thing left to do is decorate your cake... put on your ribbon and either pin it or tie bows. Add some little extras from their registry. We pinned the booties and mittens on the first one we made, and the little slippers are just sitting on top. On the second one, we stuck some spoons in, we stuck the little teethers in the bottom layer, and we put a teething ring on the top!
I told my aunt that we could display the one I made for my cousin as decoration for the shower. It does mean one less present to open, but I think it's more fun to let everyone enjoy it during the shower!
So, what do you think???


