Showing posts with label *DIY*. Show all posts

Friday, May 17, 2013

Habitat for Humanity - Women Build

When I first came to Bloomington, my boss invited me to a Habitat for Humanity breakfast, and I was instantly intrigued by the organization, what they do, and the impact it has on its homeowners.

This year, I was invited by my boss to be a part of what I consider to be the ultimate DIY - her Women Build team!  Habitat for Humanity has Women Build Week all over the country, but I have heard from many women that Bloomington has a very strong group of women who represent well!  There were many teams of women who were on the build site for the whole week and I got to be a part of the group that framed the walls!

I don't shy away from building or working with tools - in fact, if we buy a piece of furniture that has to be put together, I am always the one to jump at the opportunity... maybe that's why I like IKEA so much  :)

This experience, though, was by far one of the greatest of my life!  There were probably 30 women at the build and we worked on two houses - putting all the walls together and getting a few of the exterior walls raised!  The homeowners were also there, which made this experience even more special because we got to know them, and got to spend the day with them, and to feel their excitement and appreciation was so great!

There were some people who were in charge of measuring and cutting and putting pieces of wood together to make the components of the walls.  I spent the entire day putting the actual walls together, and it was amazing to feel more and more confident as the day went along.  I even built a few walls totally by myself once I got the hang of it!  So - here's what we worked on!!

Our first few interior walls

Our first BIG interior wall

My first completed door way!!

I didn't take a ton of pictures because we were working really hard to get these done.  The house I was working on was a 4 bedroom, 2 bathroom house so it was larger than what is normally done in the Women Build week...

A big shout out goes to all of those friends and family who supported me - in order to be on the team, you have to raise at least $250.  I was close to $400 thanks to so many people who love Habitat and who also love me  :)  SO, here's to them...


We drove by the house a few days later (at the end of the week) and here's what we found!!!


I hope to be able to go back for the dedication of the house next week - I hope it's a place where the Mosiers enjoy raising their three children and where they really feel settled and connected to their community!

Thursday, March 28, 2013

DIY Home Improvements - The Kitchen

On Monday, I showed you our weekend project - the completion of our guest bath remodel.  WELL, I realized that J and I have been doing a lot of planning for more upcoming improvements in our kitchen that I haven't shared  yet.  These are things that are going to be coming up SOON and honestly, I'm really just excited to get them done so we can enjoy them!!!

We don't have many pictures of our kitchen from before we moved in, but you can see here what color the walls and the dishwasher were before when we bought it:


As soon as we moved in, we painted, and when we went to Best Buy to look for a microwave (the house didn't have one included) and a new dishwasher (I seriously gagged from the smell when I opened it), we ended up leaving with an entire kitchen's worth of appliances - stainless steal, so here's what our kitchen has looked like since a month after we moved in:


When we moved in to the house, we knew that we wanted to redo the floors (the peel and stick vinyl that's in the kitchen is pulling up because of direct sunlight) and counter tops, and we talked a lot about using the Rustoleum cabinet refinish system to paint the cabinets white.  WELLLL, we decided that we didn't want to put the time and effort into changing the cabinets and instead, move that large pantry down and add more cabinets, that would also add more counter space.

Since we made that decision, we have been MOVING on the kitchen makeover... 

Cabinets - pantry moved and new cabinets purchased, going up this week!!  A couple of cool things we included... a wine rack that's going in with the upper cabinets and a pull out trash going in the new bottom cabinet.  Still need to pick out drawer/door pulls

via
via
Counter tops - picked and purchasing this week from Lowe's
Antiquity
Allen + Roth - Antiquity
Tile - picked and purchased from Lowe's... going in after the counter tops are done
Style Selections 16-in x 16-in Tanned Brown Ceramic Floor Tile
Style Selections - Tanned Brown (16 x 16)

SO, I'm really hopeful that we are going to have all of this done in the next month.  We are putting that tile in the downstairs half bath and the hallway that connects the bathroom and kitchen, so I think that's going to be the most involved part - that and waiting on the counter tops to be ready and installed (which we are not doing ourselves).

After that, I may pick a backsplash tile, but I think I want to actually be in the kitchen for a while before I decide what I want to do with that.  What do you think???

Monday, March 25, 2013

DIY Bathroom Improvement

It was a BIG weekend for us!!!  We did a lot of running around on Saturday - getting some stuff ready for Easter next week, and then on Sunday, we finally tackled one of our home improvement projects... the guest bathroom floor.

This is the before picture of the guest bathroom...

Before we moved in

Hard to see, I know... it's a small bathroom so it's not easy to take pictures of it.  It was a basic, builder grade bathroom with those ugly vanity light bulbs and a terrible wood medicine cabinet.  WELL, here are some things that we've done to the bathroom since we moved in:
- New light
- New mirror
- Paint
- New Hardware
- New Floor

AND, here are pictures of the finished product:


After Phase 1 - before the floor

New light (Lowe's) and mirror (Home Goods)


Above the toilet (from Home Goods)

New Hardware

NEW FLOOR!!!

And it's complete!!!
Overall, I'd say we were pretty productive this week - it took about 3.5 hours, start to finish, including removing the toilet, cleaning the floor, cutting the tiles and everything!!  We used a peel and stick vinyl tile from Lowes:

Style Selections 18-in x 18-in Sable Stone Finish Vinyl Tile
Style Selections - Sable Stone (we used 12 x 12)
I'd definitely recommend the product, especially for a small bathroom where you won't get direct sun (we have vinyl tiles in our kitchen that are pulling up because they had direct sun on them for a long time).  The feel of them is great, they won't discolor like linoleum (ours was yellowing) and I think we spent about $40 on the whole room!!!  What a great weekend!!!

What do you think???

Wednesday, January 30, 2013

Valentine's Day Decor

I don't usually get into Valentine's Day, but for some reason this year, my house felt so empty once I took the Christmas decorations down.  AND someone gave me a hard time last year for having a "Christmas wreath" up in February - since when is an evergreen wreath with pines cones a "Christmas" wreath - it's a winter wreath!!!  But anyway, I got a small amount of inspiration this year and came up with some fun stuff...

Simple (a.k.a. cheap) centerpiece


Hobby Lobby purchase - I love that store!
JoAnn Fabrics purchase - another fav store

AND, for the DIY in my Valentine's decor... I wanted to make a wreath, but my door is a deep red so the pink/red/purple I was seeing everywhere was just not speaking to me.  But, I was inspired by a wreath that I found on Take Heart and had to make it.  It was so easy and I just love how it looks!!  

I was going to give my own directions, but her's are fantastic, so if you'd like to make your own, check her out!


Close up of the cute paper flowers!!
Do you decorate for Valentine's Day????

Tuesday, January 29, 2013

DIY Ottoman

My mom came down a couple weekends ago to help me get my house decorated.  Yes, we've lived here for a year and a half, and it's not like I didn't have anything on the walls, but there were a lot of rooms that were just incomplete.  I couldn't get myself motivated to get off the couch this morning and take pictures of our house (plus, not everything is done yet) so instead,I decided to share one of the other projects that my mom and i worked on... some ottomans for my craft room.

So this room is a work in progress.  It's the bonus room over our garage, so it's a big room.  We've got my craft table in one corner, a desk in another.  We also have a couch and a bunch of book shelves and a TV so it's a great multi-purpose room!

I've seen a bunch of DIY ottomans made out of IKEA side tables on Pinterest so I decided I'd give it a shot.  In case you want to try it, you can follow along.

What i used:
2 IKEA Lack side tables
2" foam squares (trimmed to be the same size at the table tops)
2 yards white muslin (54" wide)
2 yards home decor fabric (54" wide)
heavy duty staple gun with 1/4" staples
scissors

Make sure your fabrics have been ironed and cut them in half ( 1 yard x 54")

Put one square of muslin down on the floor and set the foam in the center of the fabric.

Set the table (top down without legs) on the foam.

Cut squares out of the corner of the fabric so eliminate bulk

Fold the muslin up and attach to table with staples - start with the middle of the fabric and then left and right.  Do this all the way around the bottom of the table until it looks like this:

You'll be able to see the foam and the table on the corner
edges, but this is ok!!
Use your scissors and poke holes in the muslin where the holes for the legs are located.

Next, lay out your home decor fabric (face down) and lay the table on to (face down).  If your fabric has a pattern, be sure you're centering the pattern as well as putting it on straight.

Fold the fabric up to ensure you have enough to staple (approximately 2 inches) and if you have more than that, you can trim it so it's easier to work with.

Fold up your first edge and attach with 5 staples across.  Do the same thin on the opposite side of the table.

On one of the edges that have not yet been attached, start by folding and attaching the corners so that they look like this:


My first instinct was to fold and wrap the rest of the fabric like a gift, which would have made it look like this:


Instead of using the more triangle like folds/angles, I used my fingers to slide the flaps folds wider and it squared the fabric off a little more.  Then I stapled in the middle first, and then along the rest of the fabric. 

Kind of hard to see, but the fold in the fabric is
very close to the corner edge of the table
Then i poked the hole again where the legs would go, and I reinforced the fabric between the hole and the edge of the table with an extra staple... it helps to hold the fabric in place while you're tightening the legs.


Be careful when putting the legs back on - you may have to hold the fabric down as the top of the legs get close to the bottom of the table, and you probably won't be able to tighten the legs all the way.

Here is the finished product:


I probably could have shortened the legs on the  tables just a little bit, but overall I think they look great and they are so comfortable!!  So, what do you think???

Coming soon - Valentine's decorations  : )

Friday, July 06, 2012

DIY Diaper Cake

A while back, I showed you a picture of the diaper cake that I made for my cousin...


Well, while we were on vacation, J's cousin had a baby and we made her a diaper cake, too.  This time, I made sure I took pictures so I could share the instructions.

Here's what you'll need:

80 (ish) Size 1 Diapers - I used 84 in my first and 80 in my second
Rubber Bands - variety of sizes (I got mine at Target)
Straight Pins - around 20??
Cardboard Cake Round (I used 14") or other base (you could use a cake plate, too)
Dowel Rod -OR- 2 Bottles -OR- a Bottle and a container of Baby Powder -OR- a bottle of champagne
Packing Tape
4 receiving blankets, 2 of the 4 matching if possible
Ribbon, 1-4 coordinating colors
Other little stuff from the registry that you can decorate with
________________________________________________

Start with a diaper... I used Pamper's Swaddlers... I'm calling this "face up"


Flip the diaper over to "face down" and roll the bottom layer toward the bottom of the diaper.


You'll only be able to roll it to the bottom of the leg hole and then you'll have to flip it over again to be "face up".


When it's face up, you'll have to fold the bottom of the diaper up to the roll and then roll it the rest of the way.  It's kind of hard to see in this picture, but if you're doing it, it will make sense... you can't get a tight roll without doing this.


Once your diaper is rolled, put a rubber band around it to hold it together.  Repeat this until you have all diapers rolled up.


 To put the cake together, you'll start with your base.  For this one, J just cut a circle from a cardboard box and we covered it with freezer paper.


Then you'll want to attach your "structure" to your base with some packing tape.  This is what you're going to put your diapers around... I used a dowel rod for the first one (which is probably why it was easier to get more diapers around it) and if you think your friends/family would appreciate it, this is also where you could put a bottle of champagne for the parents to celebrate with  :)


 Start by putting a ring of diapers around the base to start the bottom layer.


Do the same to make the second layer and the top layer.


This is where you kind of have to feel your way through the process.  In my first one, I did some algebra and came up with an actual number of diapers that should have bee in each layer.  WELL, that was a good starting point, but I ended up making adjustments, so just know you'll have to be flexible.

On this one, I grouped the diapers into groups of 4, kind of in the shape of a diamond, and then filled in to make it sort of look like a circle.  Ultimately, the receiving blanket is going to really make the circle.


Once you have your layer made, you'll wrap two receiving blankets around and pin them.

CAUTION: do not pin into the diapers... diapers should not have holes in them.

If you have two matching blankets, put them both on the bottom.  I folded the visible edges over to make them look finished.

Put your second layer of diapers on, wrap them with a receiving blanket and pin them.


Same thing with the top layer...


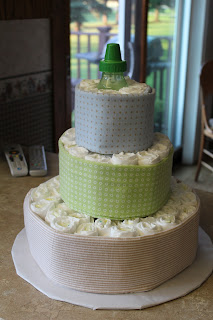
Here's what it looks like when you are done putting the layers together.  With this one, we obviously left the bottle sticking out of the top... we thought it was cute.  If you're using a dowel, you would want to cut it so it is just below the top of the top layer.


The only thing left to do is decorate your cake... put on your ribbon and either pin it or tie bows.  Add some little extras from their registry.  We pinned the booties and mittens on the first one we made, and the little slippers are just sitting on top.  On the second one, we stuck some spoons in, we stuck the little teethers in the bottom layer, and we put a teething ring on the top!


I told my aunt that we could display the one I made for my cousin as decoration for the shower.  It does mean one less present to open, but I think it's more fun to let everyone enjoy it during the shower!

So, what do you think???


Tuesday, July 03, 2012

DIY Towel Cake

My cousin's bridal shower was on Saturday (recap sometime next week) and one of the gifts that also served as a decoration was the towel cake that my mom and I made.  My friend made me the cutest towel cake for my bridal shower...


I don't feel like mine is as amazing as hers, but overall I'm pretty happy with how it came out!

Here are the step-by-step instructions...


You'll need:
A cardboard cake round (mine is 14") or other cardboard base
A dowel rod
Ribbon - I used three different kinds, 1 wired and the other two not
Safety Pins - optional
Decorative push pins - I used the ones with pearls
2 bath towels
3 hand towels
4 wash cloths (I used 2 wash cloths and a hand towel)
___________________________________________________

Start by laying your bath towels out and folding them into thirds.  The width has to be the same.


I put safety pins on these towels, but it's optional.  I only used them on the bath towels.


Next, roll your bath towels, making sure you have a good amount of space in the middle so you can get it on the dowel.  I just used my finger and didn't wrap it too tightly.

You will have wrinkles that come up as you roll... just tuck those into the roll as you go.  I promise, it doesn't have to be perfect, even though you'll feel like it does!  The most important thing to be sure about is that you are keeping your rolls level.

When you are done rolling, you will have a right side and a wrong side.  The wrong side is the one with the edge of the towel showing... that's the side you want down.

Wrong side...

Right Side!
Once you are done rolling, you'll want to pin the towel.  In my opinion, it's always better to put too many pins in to start.  You can always take them out as you go... it's better to be sure the towel is not going to come unrolled as you are working with it.  Here's how I placed mine.


Once it's pinned, place put the dowel in.  I did not attach the dowel to the base.


My second layer was three hand towels.  As you can see, one of them is different... that is because that's what my cousin registered for!  I just put the one with the J on the inside of the roll where no one will see it.

I folded these into thirds as well.  Folding them in half made them taller than the bottom layer, which just didn't look right.


I did the same rolling with these, without using the safety pins.  I also pinned them the same way with the straight pins.

When I got to my last layer, I got too focused and forgot to take a picture of the before.  I used the other "J" towel and two wash cloths... the wash cloths were folded in half and the J towel was folded to match.  I put the J towel on the inside again.  Same rolling, same pinning... this one was a little harder to pin because I really had to stretch the last wash cloth to get it all the way around the top layer.

You'll obviously have to put the second and top layer on the dowel from the top.  It's easiest to use your fingers to ensure you have a clear path for the dowel before you try to put the towels on.  Be careful not to push the center of your towels out... you'll have to re-roll them.

back - all seams/pins line up

Front
I happened to have this white ribbon that I found in my box of wedding stuff, so I used it as my base ribbon.  You can start with a color


The next thing I did was to make the ribbon for the top.  This could have been the last step, but I love my Bowdabra and couldn't wait to use it!!!


I used wired ribbon and made a cute bow for the cake topper

View from above the cake
I also used the same ribbon to make cascading curls, which is also what I used to attach the bow to the top.


Before I curled the ribbon
Then I attached my two other ribbons.  This is where I took pins out and put them back in to make everything lay right.  I also folded my top ribbon edges over before I pinned them to give it a finished look.


Last thing I did was to curl the long strands and VOILA... A CAKE!


SO, what do you think?

Don't forget to stop by tomorrow for a red, white and blue Wedding Wednesday!!!